
The Custom Fields feature gives you the option to add more fields to your booking form so as to customize it to best match your business needs. The customer’s first and last name, email address, and phone number are there by default, but with the Custom Fields feature you can add extra fields if you want to ask a customer a question, collect additional personal details, or for any other reason.
For appointments, these fields will appear on the Booking form under the default fields, and once your customer fills them this information will be shown in the appointment information on the back-end.
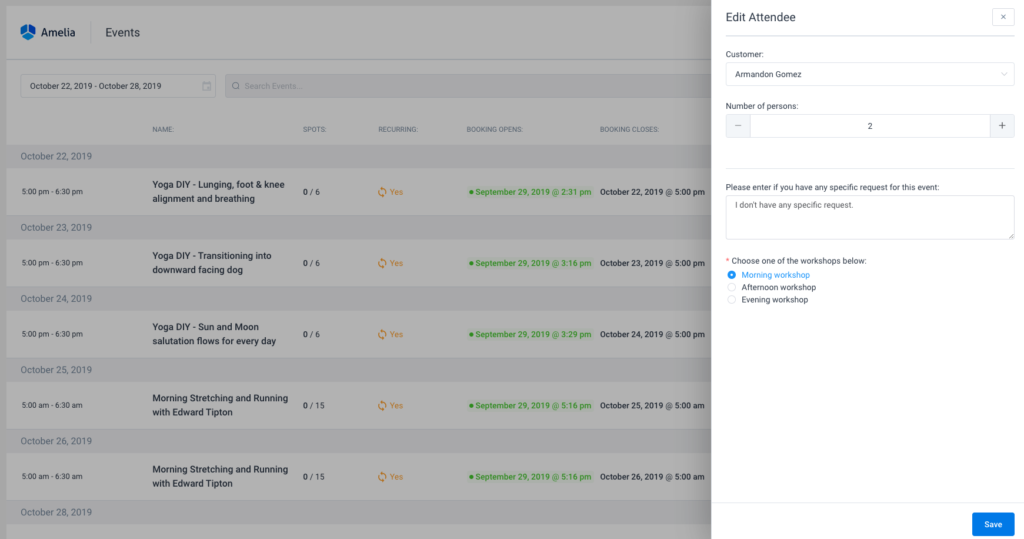
As for the events, custom fields will be shown in the same place on the front-end booking form like for the appointments, but when it is about the back-end the place for the custom fields is different and you will find them when you open the Attendees list and click on any attendee. Once you click on the attendee on the list you will see an option “Edit attendee” and by clicking on that option the custom fields will show up.
Setting up the Custom fields
There are several field types you can add:
- Text,
- Text Area,
- Text Content,
- Selectbox,
- Checkbox,
- Radio buttons
- Attachment (currently .jpg, .jpeg, .png, .pdf, .xls, .txt, and .csv are supported)
- Date picker
You can add as many fields as you need. The Text Content custom field supports HTML so you can add links, pictures, colors, etc. to customize the text better.
To add fields you need, go to the “Customize” page and click on the Custom Fields tab located beside the Colors & Fonts tab. Click on the “Add Custom Fields” button and choose one of the field types, or use the “+” button at the bottom of the page to add it.
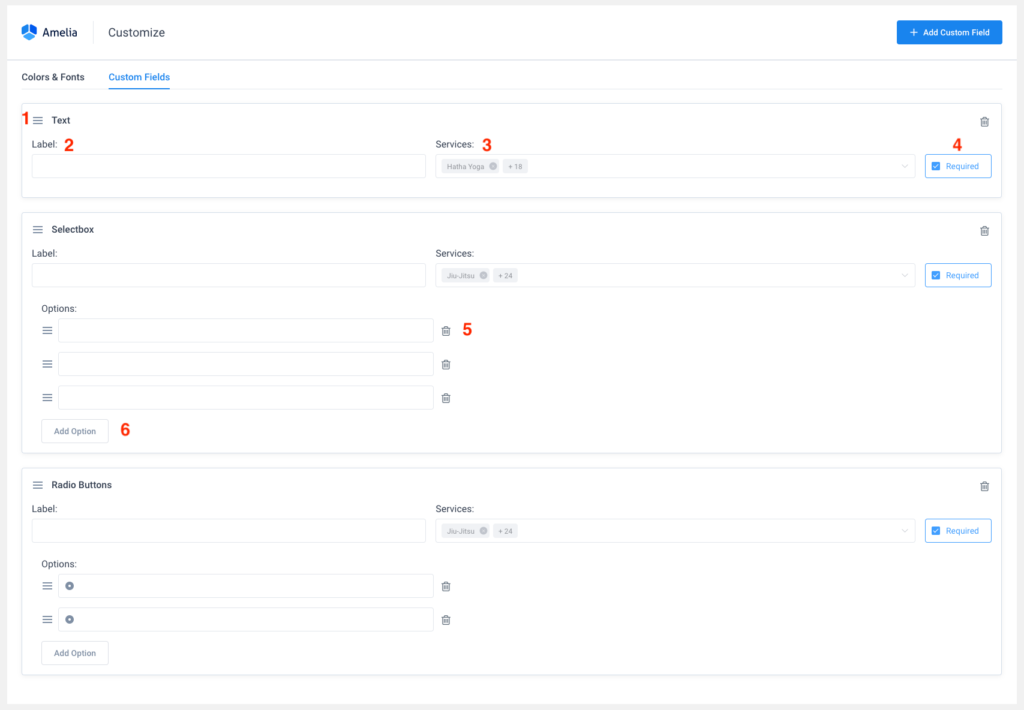
After you add a field you will see these options:
- Ordering – Use this option to reorder your custom fields – the order you set here will be the order customers will see on the booking form.
- Label – Use this option to enter the name of your field. The name can be in form of a question, an additional option, or whatever you need.
- Services – If you have multiple services and you require additional information for one or more of them, you can set it here. The Services option allows you to choose the services for which this field will be displayed. If you want to show this custom field for all services just choose the “All service” option from the dropdown.
- Events – if you have multiple events you will have the option to choose for which of them this custom field will be shown. If you want to show this custom field for all events just choose the “All events” option from the dropdown.
- Required – Here you can set whether the field will be required or not. By default, when you add a field this option is enabled, but you can set it different for every field.
- Delete – Next to each field, there is a trash can, so you can delete it with one click. There are also trash cans beside each option you add for the selectbox, checkbox, and radio button fields.
- Add Option – this option is visible for the selectbox, checkbox, and radio button fields, and enables you to add as many options as you need for each of these fields.
- Send custom fields info for each customer separately – this is a new option added above all custom fields so you can choose how info from the custom fields will be sent if you have group appointments. If you check this checkbox that will mean that each new notification sent to the employee about a new customer booking in a group appointment will be sent separately. If unchecked then your employee will receive info about all customers together in the notification, and each time when a new customer books that appointment employee will receive more data.
Once you’ve finished setting up the custom fields, refresh your booking form and the fields will become visible to you and your customers.
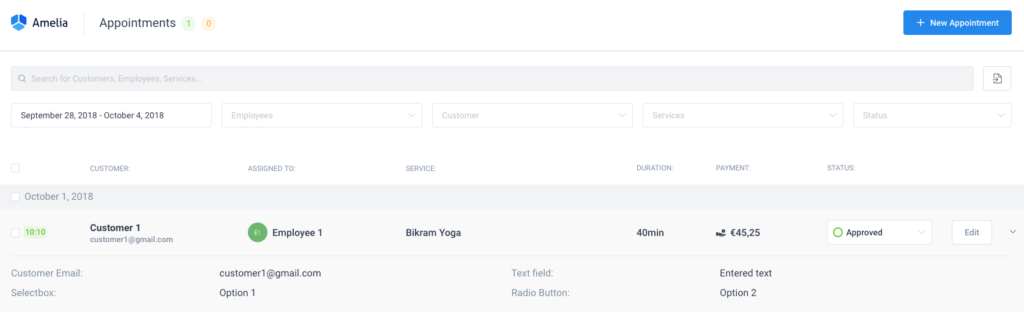
After your customers enter additional information in the fields and book an appointment or event that information will be saved in the appointment/event and you can see it in several ways:
- By clicking on the appointment in the appointments list. After you click on it, the appointment will expand and show the additional information.
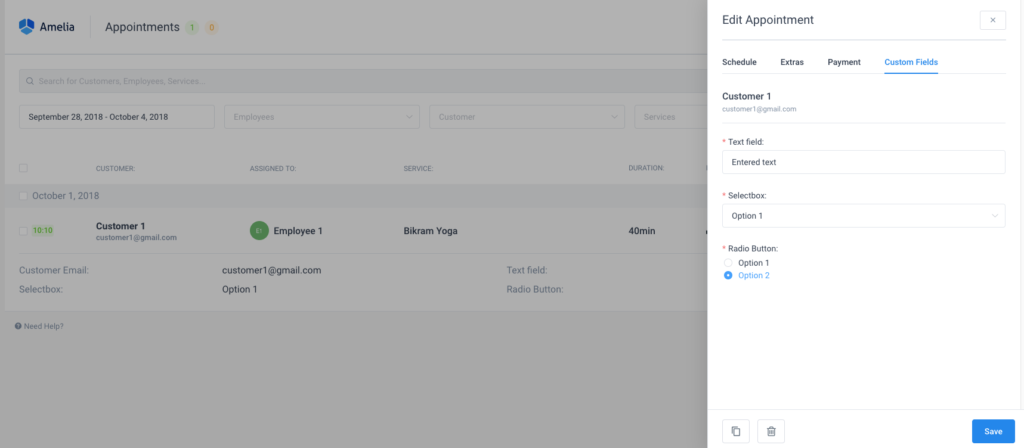
- By opening the Edit Appointment dialog. When you open the Edit Appointment dialog you will see a new “Custom fields” tab. There you can see the additional information from your customers, and you can also edit it if the customers send you some changes, for example.
- By opening the Attendees list on the Events page. Once you go to the Events page, open the attendees’ list, click on one of the attendees and you will see an option “Edit attendee”, click on it, and attendees details together with the custom fields will appear.
If at a later time you want to change some field or delete it, don’t worry. The customers’ information collected before the change will stay in the scheduled appointments, and the change will only affect new appointments.
Please note: New services and events will not be added automatically to the custom fields if the custom field is set to show on all services and/or events. When a new service or an event is added, the custom field will need to be edited in order to be applied to the new service and/or event.
