
When you receive an email notifying you of an appointment, follow these directions to update the status of that appointment...
- Log in to your site (https://yourdomain.com/editsite)
- When you first log in, you will see the taxPRO dashboard. Click the button 'Pending Appointments'
- Alternatively, you can find your appointments calendar and then look for 'Appointments'.
- You will see a list of appointments scheduled. Notice, you can change the date values to find your particular appointment.
- Within the Status dropdown select, "Approved" to Approve the appointment.
Once the appointment has been approved, your client will then be notified.
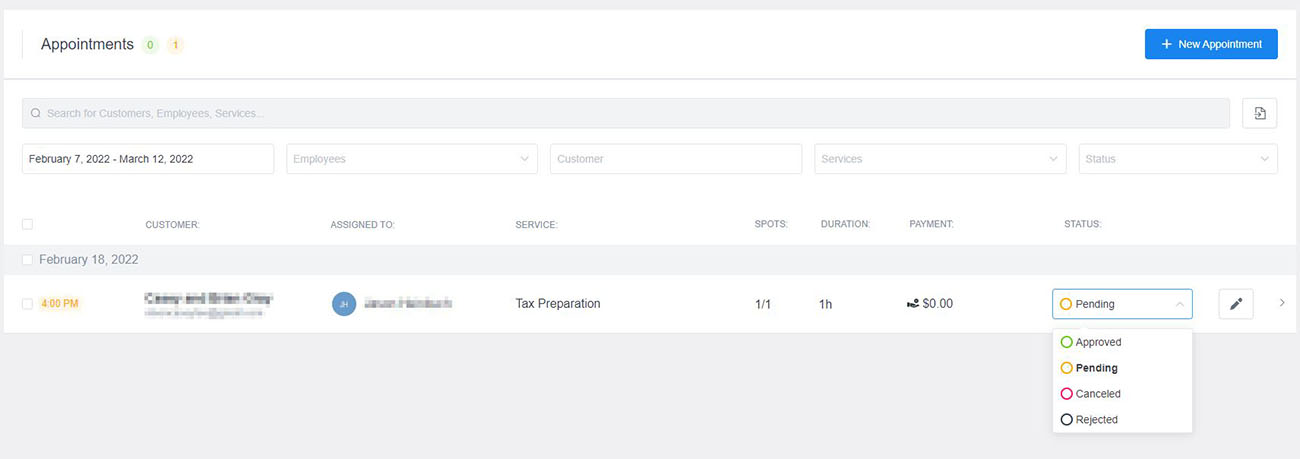
Appointment statuses
Statuses are the appointment state indicator, that indicates whether the arrangement is approved, pending, canceled by customers, or rejected by the employees.
Currently, there are 4 statuses:
APPROVED
In the plugin General Settings, you can set for all your appointments to have an Approved or a Pending status by default. If you choose Approved, all appointments will be automatically confirmed to the customer immediately after the scheduling.
PENDING
If you choose Pending, you will need to manually approve all appointments after they are scheduled. The appointments can be approved by the administrator and by the manager, and if you enable notification for this action, both employee and customer will get informed about this action.
CANCELED
Cancel status allows your customers to cancel the appointments through the back-end of the plugin. Once they log in, on the Appointments list they will see the Cancel button beside each future appointment. After they cancel the appointment on your list will get display Cancelled. If cancel notifications are enabled your employee will also be informed.
REJECTED
Last but not least, Rejected status allows Admin, Manager, and Employee users (see user roles) the option to Reject Approved or Pending appointments. You can also set a notification for this action, so once the appointment is rejected, both customer and employee will receive an email notification.
You have two possibilities for changing appointment statuses: you can change it directly through the appointments page, or you can open the appointments dialog and change the status. For the first option, on the appointments list, click on the appointment status drop-down and change the status. For the second option, click the edit button beside the appointment, the Appointment dialog will open. Click on the status button, and you will see a drop-down where you will be able to choose a new status. The main difference between these two is that in group bookings, by clicking on the first option you are changing the appointment status for all members of the appointment, while the second option allows you to change the status for each member separately.
On the appointments page, you will see a status filter so at any point you can filter your list to see appointments with one specific status.
